I. Start & edit an application
I.1. Start the Cekenz Editor
Start the Cekenz Editor software, The main view displays the list of existing applications present in the database. You can create a new application, edit or delete an existing one.

Some information are displayed corresponding to the selected application in the list: The last modification datetime, the publish stage, for now is always Dev. The number of screens in the application and then the consistency of the application: correct or wrong. This state is set to Wrong if one error or more, is found in the application content. The concept of consistency is described below in this page.
I.2. Create, Edit or delete an application
If you create a new application, a dialog box is first displayed to provide the name. Then the application is created, Cekenz Editor displays a new view to edit the content: list of screens...
If you edit an existing application, Cekenz displays a new view to edit the content.
If you want to delete an application, a dialog box ask you to confirm the deletion. The application and all its data content will be deleted.
II. Edit an application content: screens & data
II.1. The main view
When creating or editing an application, then a view having four tab items is displayed.- The first tab item displays the list of screens defined in the application
- The second tab item displays the data defined in the application.
- The third tab item displays the consistency details (errors) of the application
- The fourth one displays parameters, for now there is only the name of the application that can be changed.
II.2. Managing screens
This tab item displays the list of screens of the application. The order of screens is the default order for the application to display screens by clicking on the next screen chain command on each screen. The first screen of the list will be the first screen to be displayed when executing the application.
It's possible to change the order by moving up or down the selected screen. You can create, edit or delete a screen.

When creating a new screen or editing an existing one, Cekenz displays a view to edit the content of the screen.
II.3. Managing data
This tab item displays the list of data of the application. Data are used and displayed in components. Its possible to create string variables (but usage of it is not yet implemented) or dataTable variables. DataTable can be used in combobox components.
You can create, edit or delete a data.
When creating a dataTable, a dialog box ask the user to input the name, the DataTable is created empty. You can add or delete columns and then add or delete rows. Then you can edit cell content, by clicking or by fire the F2 key on the cell to modify.
II.4. Consistency of the application
The third tab item displays the errors present in the application. When clicking on the button Refresh, the editor analyze the content of the application and check it for consistency. For example, a screen must have a screen chain command (a button) to go to the next screen. The first screen can't have a screen chain command previous (go back to the previous screen) because there is no previous screen.,...

II.5. Test the execution of the application
It's possible to test the execution of the application immediately, to see how the application you are building works. Click on the button Test and then the execution will start.
On the dialog box displaying the execution of the application, you can stop it by clicking on the button "stop".
III. Edit a screen content
III.1. The main view
When editing the content of a screen, a view having three tab items is displayed.- The first tab item displays the list of steps and components of the screen.
- The second tab item displays the scren chain mechanims.
- The third tab item displays the parameters of the screen, for now, there is only the name that can be changed.
III.2. Edit the steps and the components of the screen
This is the more complex view of the editor. On it you can manage steps of the screen and the components of the selected step and then the component details of the selected step.
The tab view is splitted in three parts, from the left to the right.
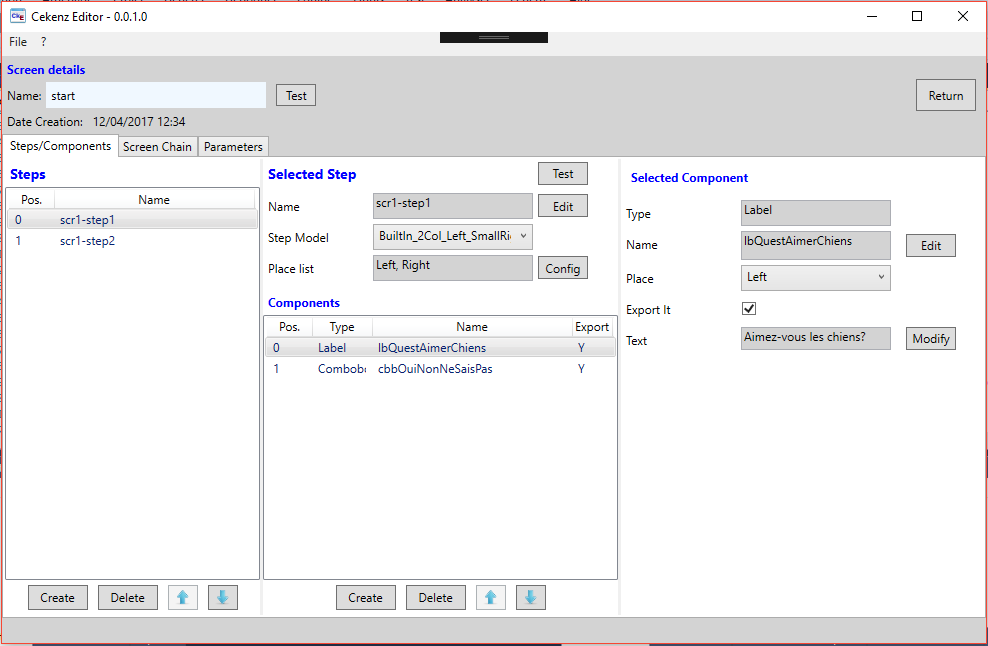
III.2.1. Steps
This view part displays the list of steps of the screen. They are displayed stacked in the screen, from the first one to the last one. You can create a new step or delete an existing one. It's also possible to re-order the steps displayed in the screen: on the selected one, you can move up or move down the step.
III.2.2. Selected step
For the step selected in the main list in the left part of the view, the detail is displayed in the center part on the view. You can change the name, change the step layout model among the available models. You can configure each layout child of the selected step layout (not fully implemented).
Then the list of components presents in the step are displayed above. You can add new one or delete an existing one. It's also possible to re-order the components displayed in the steps: on the selected one, you can move up or move down the step.
Remark: The list of components is global to the step, even if the step layout has two or more areas childs to receive components (but the order will be correct on each area).
It's possible to test the execution of the current step immediately, to see how the step you are building works. Click on the button Test and then the execution will start. On the dialog box displaying the execution of the step, you can stop it by clicking on the button "stop".
III.2.3. Selected Component
For the selected component in the center area, the detail are displayed in the right part view. You can change the name, the place in the step layout area, decide to export or not the result of the component and then define the content depending on the type: edit the text for a label or a radioButton, select and set a DataTable for a combobox,...
III.3. Edit the chain mechanims of the screen
On this view, define the screen chain mechanism of the screen. You have to select the model among the availables models in the list. Automatically the screen chain will be set in the screen.

III.4. Test the execution of the screen
It's possible to test the execution of the current screen immediately, to see how the screen you are building works. Click on the button Test and then the execution will start. On the dialog box displaying the execution of the screen, you can stop it by clicking on the button "stop".
<Return back to the home page